Posts

Showing posts from September, 2020

Triggering Trigger Volumes

Image
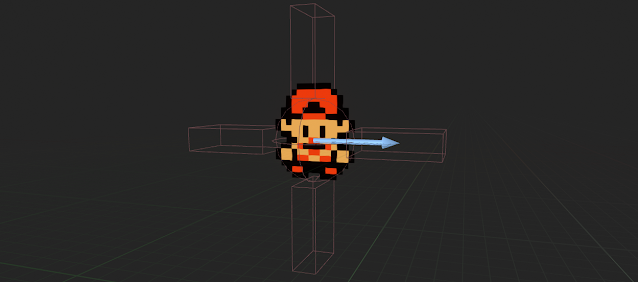
  I want my character to have directional triggers, so that interaction only occurs in the direction that the Hero is facing. In order to do this I'm going to make four separate trigger volumes that will flip on and off based on movement. Trigger Volumes Colliders can do some cool stuff. They don't have to be just physics based, though. We need trigger volumes for our Hero. I created four box collision components and attached them to my Sprite component, then adjusted their sizes and positions to form a cross. Three types of collision shapes. Set up in the hierarchy. What we want is to make these into triggers, since we don't want them to physically block anything. Name each one with a proper direction for referencing and then adjust the Collision settings in the Details panel for each with "Collision Presets" set to Trigger. Now these four volumes will send out overlap data. But we don't want them on all the time. The goal here is to have them switch on and

The Pause Menu

Image
With a  main menu  created it's now time to make an in-game pause menu so that the player can quit the game (and eventually save). With these two menus sandwiching our game there will be a successful way into and out of our game, whatever it may become.  What's On the Menu? We really only need three things right now: Resume, Save, and Quit. We'll make the Save button, but we'll reserve making that button do something for another time when we go over saving and loading. First, let's make a button for bringing up the menu in-game. M is for Menu? I chose "M" for Menu, but you can do anything. Let's make a new Widget Blueprint for our Pause Menu. Right click in the content browser as usual and make a "WB_PauseMenu". We've been through making a menu before. This is very similar but we're going to add one fun thing: a background blur. Right-click on the default canvas panel and select "Wrap With..." > "Background Blur"

Making a Main Menu Widget

Image
We have a Hero , with animations and movement , and a world for him to walk around in. For a game to have a beginning and an end, however, there needs to be an entry and exit for the player to start and stop. It's time to dive into Unreal Engine's widgets . Our First Widget In the content browser right click and go to User Interface > Widget Blueprint. This will make a new widget, which you should name. I use "WB_" as my prefix for Widget Blueprints. This one will be called "WB_MainMenu". Creating a Widget Blueprint. Double-click and open up the Widget Blueprint editor . This is kind of like playing around in Photoshop now, if you've ever done that. Or any image editing software. We'll be using layers and a hierarchy to manipulate and stitch together images on the screen that can be buttons, text, images or colors, and also organizational tools. On the left you'll see the Hierarchy tab. It shows currently just the name of your Widget Blueprin

Using Animations with Directional Movement

Image
Wouldn't it be more fun if our Hero could actually use the animations we've given him? Or face the direction he's moving? Yes, it would be. Let's make that happen using Blueprints. Face the Music We're now going to make our first function. This allows us to contain a complex set of Blueprint nodes into a single custom node that we can call. It keeps our Event Graph clean and easily readable. Double-click and open up your Hero's Blueprint. On the left side, beneath Components, in the My Blueprint window, you'll see a hierarchy of tabs with Graphs, Functions, Macros, Variables, Event Dispatchers, and Local Variables. This contains all the information your Blueprint has. We're interested in Functions. Go to the little + symbol to the right of the Functions category label and when it expands hit "+ Function". Getting funky. Name it something like "Set Flipbook" as I have. If it didn't open up automatically, double-click the new funct

Paper Character Setup & Movement

Image
Alright, let's keep going. We left off with a little world of our own—our sandbox tile map—and extracted sprites in preparation of our Hero. But we didn't make him yet. Feel free to choose your own sprites for your own Hero or Heroine. I'll be using good ol' "Ethan" from Pokémon Gold/Silver  to keep the theme going. For animation, we need to create something called a Flipbook. Think of this as when you doodle in the corner of a book, or on some notecards, and then you flip the pages and it makes them animated. It's the same concept, except we're using those sprites. We'll need two different states of Flipbooks: movement and idle states. Let's begin with movement. The Wonderful World of Animation Left movement. These sprites have two images for movement. You can see above I've selected the two left facing ones. Right click the sprites and at the top of the menu click "Create Flipbook." Name the newly created file with your naming